Outlook Calendar Beginners guide
Sydney's Seminar
Outlook is an often overlooked gem of the Microsoft Suite products, so today, we will highlight one of our favorite applications with an Outlook Calendar Beginners Guide. There are two main features of Outlook: the Email and Calendar. Both have great ways of ensuring productivity and organizing your daily workflow, and this guide will give you a basic understanding of how to use both.
If you were to ask our Founder and President, Darren Clark, about his favorite organizational tool, he would undoubtedly exclaim, Outlook Calendar. He uses it to track every part of his day and often leaves notes for himself. In this blog, we will explain how to use Outlook to organize your day.
WHERE TO BEGIN
When you open Outlook, the application defaults to opening the Email function. To toggle between the different functions, use the tabs in the lower-left corner of the page (fig 1). Clicking on the envelope symbol opens Email, the calendar symbol opens the Calendar, while the icon of two people opens the Contacts page, and the clipboard icon opens your Tasks.
Once you toggle to your Calendar, I recommend arranging the view to your preference first. You can do this in the Arrange section of the top ribbon, where you can decide if you want to see a daily, weekly, or monthly calendar.
new appointment
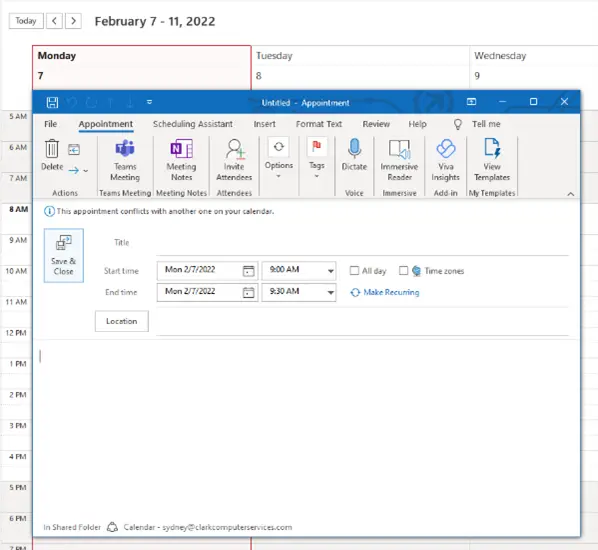
Once you have the page set up, you’ll want to start blocking off your day with Appointments. To create an Appointment, you can click the New Appointment button in the upper left corner of the app or use the [Ctrl + N] shortcut keys. Either way, you’ll get a wizard (fig 2) to help guide you through creating an appointment.
Start with a title in the top line, and then add some notes in the box underneath. While helpful, adding notes is optional. It is even possible to add attachments by navigating to the Insert tab. This tool can also be helpful to add emails or tasks needed for your appointment.
recurring appointments
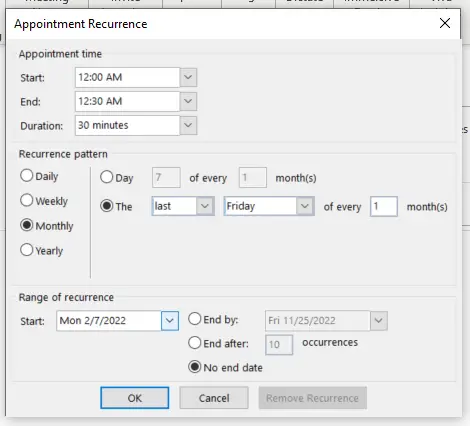
Some appointments may need to show up several times, and you definitely don’t want to create dozens of appointments manually. So, once you complete the appointment, navigate to the blue link titled Make Recurring.
In the pop-up (fig 3), you can define your recurrence pattern. Perhaps you want this appointment to appear on the last Friday of every month. To do this, click the option for Monthly in the left column, put a 1 in the Recur every field, and check the box next to Friday.
Once you define the pattern, go down to the Range of recurrence section, where you can decide how many times you want the appointment to repeat. If you have no preference, you can click No end date, and the appointment will repeat indefinitely or until you delete the series.
planning your day
One of my favorite features of Outlook’s Calendar is the ability to manipulate the day visually. By clicking and dragging the appointments, I can move them to whichever timeslot I prefer. I can also grab either the top or bottom edge of the appointment and drag it to change the duration without opening up the appointment.
Here’s a timesaving tip: You can double click the timeslot you want for your new appointment in the calendar, and the wizard will pop up at that time!
sharing calendars
To make scheduling easier with friends, family, or co-workers, you can share your calendar with other people, or add other people’s calendars to your view. The buttons for these options are in the Manage Calendars section of the ribbon. Once you click to share your calendar, navigate to the Permissions tab of the Calendar Properties that pops up. Here you can decide the extent to which the people you invite can view or edit your calendar.
If you have any difficulties with Outlook Calendar or need additional training, please reach out to us at 301-456-6931 or email us at [email protected]

Being raised by Clark’s owner, Darren, I have always been immersed in the world of technology. However, I have always followed it from a distance. I went to college to get my degree in Business Finance and Applied Economics, as I have always been a fan of research and statistics. I was even lucky enough to get my senior thesis in economics published. My next string of luck was getting a job straight out of college as a Researcher in Richmond, VA. I was able to pursue research and publish dozens of news articles in my field. Now, I am so excited to delve back into the world of technology that I was raised in, and look forward to honing my research in the technological field.


