Microsoft Outlook Tips:
Setting Up Signatures
Sydney's seminar
Using a professional-looking signature is essential in business, but setting up signatures in Microsoft Outlook can be challenging.
Business relationships are often more virtual than personal, and email is the most common form of communication. With that in mind, we want to be sure to include contact and branding information in all emails to vendors, clients, and external stakeholders. In the last edition of Sydney’s Seminar, I explained how to set an Out of Office message in Microsoft Outlook, and I’m continuing this series of Outlook tips by explaining how to set up Signatures in this blog.


Where To Configure Signatures
Many users struggle to find where you can configure your signature in Outlook. In truth, finding the setup wizard is half the battle. To locate these settings, click on the ‘File’ button in the upper lefthand corner of Outlook. The Account Information screen should appear with a blue vertical banner on the left. At the bottom of this banner, click the ‘Options’ button. The lefthand banner shows a list of categories where you can find settings. To configure signatures, click the ‘Mail’ option, which is second from the top.
The screen on the right should read “Change the settings for messages you create and receive.”
In the third button down on the light side, you’ll find the title ‘Signatures…’ This is where you create or modify email signatures.
How To Configure Signatures
Now that you’re here, you’re halfway done.
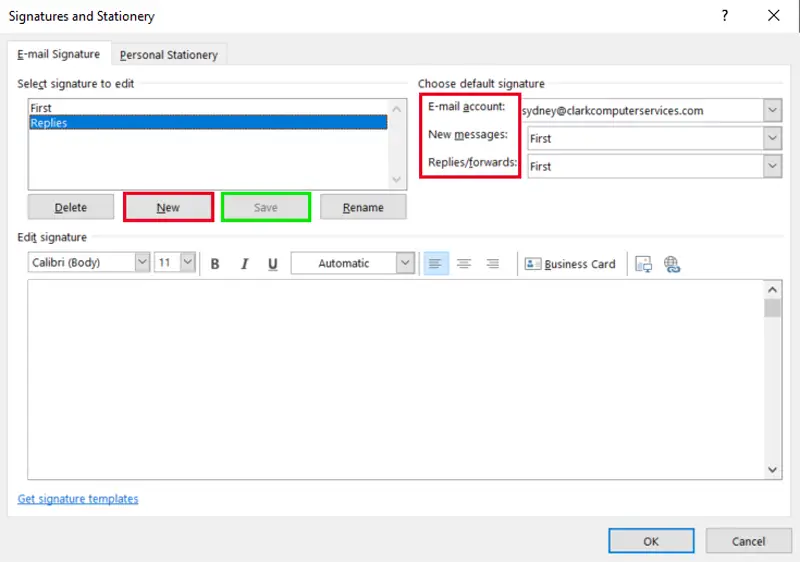
In the Signatures and Stationery box, also called the setting wizard, you can edit Email Signatures on the first tab. One of the great features you’ll find here is the ability to have different signatures for various types of emails.
Let’s get into it. To create a new signature, click ‘New’ and add a name for the signature. In my example, I titled it “Replies,” as this will be the signature I want to show when replying to an email rather than sending an initial email.
In the text box, you can create and style the signature. If your company has a signature template to match its branding policies, it can be easily copied and pasted into the field, allowing you to edit and personalize.
When creating a signature yourself with no guidelines, you can control the font, size, color, and alignment of the signature and add images and links. Typically, a good email signature has your first and last name, affiliation info (company, job title, department, etc.), contact information (physical address, email address, phone number, etc.), social media profile links, and a logo.
Here’s a Pro Tip, if you’re having difficulties formatting your signature in this box, build it in a new email or Microsoft Word. After it’s formatted the way you want, copy and paste it into the signature wizard.
Once you’re happy with the signature, be sure to click ‘Save.’
After you save it, highlight the signature in the upper box and choose your default settings to the right. Make sure the signature is assigned to the correct email account, and decide if you want this signature to go to all new messages and/or replies/forwards. Once you’re done, click ‘Save’ again and exit the wizard by clicking ‘Okay’ on the bottom right.
Using Personal Stationery
Once you finish with the signature, this is also a great place to edit your Personal Stationery, which is simply the default formatting of your email messages. When you click on this tab in the ‘Signatures and Stationery’ settings wizard, you’ll see four sections.
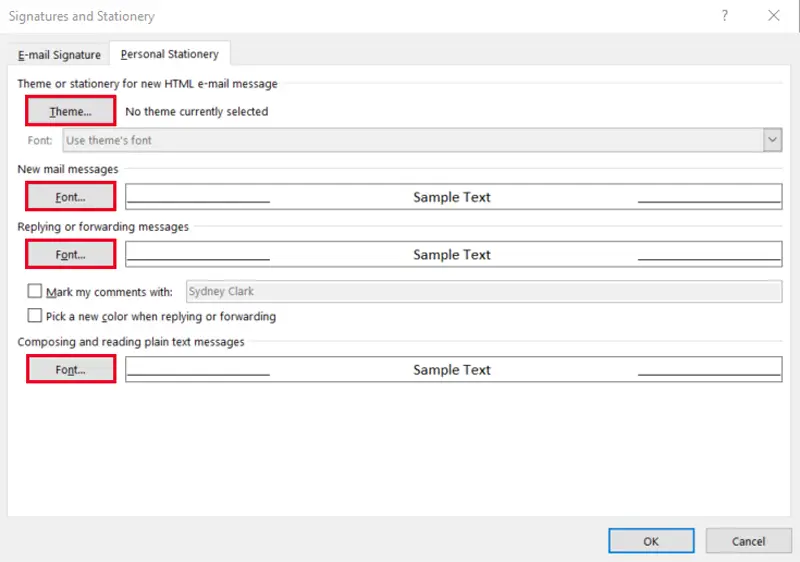
Section one, titled “Theme or Stationery for new HTML email message,” simply allows you to choose a preset format for your email. After clicking the ‘Theme…’ button, you’ll see a long list of options. These themes set a default heading, bullet list, horizontal line, link appearance, and background. Because it is a theme, it could even change the default font unless you change the drop-down menu to ‘Always use my fonts’ or ‘Use my font when replying and forwarding messages.’ If you want to change the font, keep reading.
Sections two and three allow you to choose a font for new mail and replies/forwards, respectively. After you click the ‘Font…’ button, choose the font, style, size, color, underline style and color, and effects (strikethrough subscript, etc.). Clicking on the ‘Advanced’ tab allows you to change the spacing and OpenType features, but if you’re not sure what that is, it’s probably best to leave the default settings as you could make the fonts unreadable.
Once you’re done making changes, don’t forget to click ‘OK.’

Sydney Clark
Director of Operations
Being raised by Clark’s owner, Darren, I have always been immersed in the world of technology. However, I have always followed it from a distance. I went to college to get my degree in Business Finance and Applied Economics, as I have always been a fan of research and statistics. I was even lucky enough to get my senior thesis in economics published. My next string of luck was getting a job straight out of college as a Researcher in Richmond, VA. I was able to pursue research and publish dozens of news articles in my field. Now, I am so excited to delve back into the world of technology that I was raised in, and look forward to honing my research in the technological field.